Here phishy phishy phishy…
As a red teamer, I will often phish my targets. Most of the time I’ll do this to gain an initial foothold in to the target environment, however sometimes I may also phish victims as part of my escalation methodology. To be honest, sometimes I may also phish the targets just to feed my own curiosity regarding how people think and respond to different scenarios presented to them.
I am often asked what type of setup I use, what protections I put in place for my infrastructure, which framework do I like to use, etc etc.. so I had a light bulb moment; why don’t I just write up some details so that others may learn and so I don’t have to repeat the same conversations too many times. There’s also the added bonus that a write-up could act as informal documentation should I lose my mind some day and forget how I do what it is that I do.
This write-up is not going to go into detail regarding my permanent red team infrastructure setup. Why? Because it’s mine. What I am going to do however is show you how you can stand up a ‘once off’ server instance for your phishing needs, which will also be just as relevant if you decide to build a phishing server within your own permanent red team setup. So sit back, grab a nice cup of tea, and let’s go phishing.

Some assumptions first up:
- This box will be built in the cloud, I.E. on someone else’s computer. I choose to use Digital Ocean for my quick one-off boxen, however you can just as easily use Vultr, Linode, or whatever other provider you’re aligned with this given week.
- I’ll be using Debian 9 for this build. However, once again choose whatever distro suits your style.
- I will use the domains “example1.com” and “example2.com” as the domains for our phishing emails.
- This is just how I set up my infrastructure as it has proven successful for me many many times. There are one thousand and one other ways to do this setup differently, so take what you need to from this build and tweak it where you wish.
Digital Ocean:
Digital Ocean have a great guide to setting up Debian 9 here. Have a read and follow the bouncing ball to get the base system up and running. The summary steps I use are as follows:
- Create a droplet on a standard plan. The $5/month option works well for short sharp gigs.
- I generally use Singapore as the DC, but pick what suits your needs.
- Add your SSH key/s so you can connect to the server. If you’re not sure how to do this, take a look here.
- For the hostname, enter
mail.example1.com, which is our first phishing domain. - Finally create the droplet.
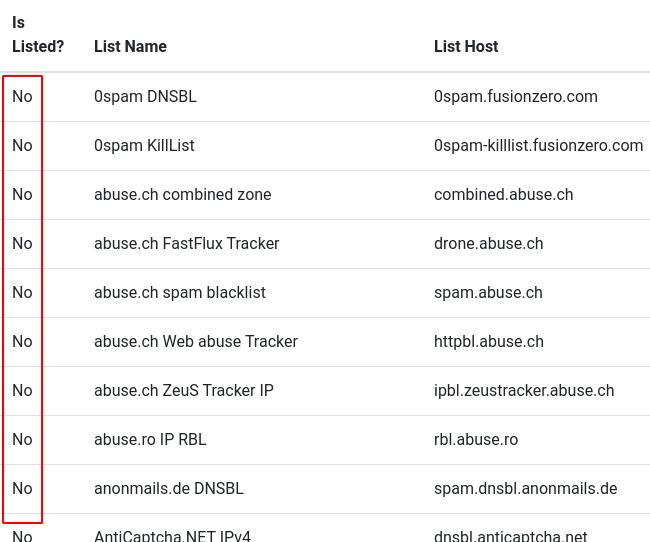
Before we get carried away building our server, it’s important to check that the IP address your droplet has been assigned is not currently on any blacklists. Why?
Simple… reputation scores are extremely important when building phishing infrastructure. Any blemishes on your server’s record will go against you when the victim’s email infrastructure checks to determine whether your email is malicious or not. Grab your public IP address, and throw it into whatismyip’s blacklist checker, which can be found here
Ideally you want to see a ‘No’ against every provider in the blacklist check.
Onward we march. With the following steps, we’re going to install a firewall on our server, install a handful of necessary packages to get the job done, create a new user so that we’re not abusing the ‘root‘ account, as well as lock down the ‘root‘ user from being able to SSH in to our server. No pretty pictures for this as it’s 101 *nix work.. let’s roll!
- SSH on to the server as root@ipaddress
- Install ‘
ufw‘; a noob friendly firewall management package. - Install some tools to make our life a bit easier when debugging.
- Enable OpenSSH connections ingress to our server and enable the firewall.
- Next up, let’s create a new user so we can leave ‘
root‘ alone. We’ll also give the new account full permissions to execute commands as the userrootby adding the new user tosudo. - Next we will copy root’s SSH key over to the
phishermanuser. This is usually a big no no, but for our quick shot server this will be fine. Feel free to generate your own keys etc etc if this is going to be a permanent server in your red team infrastructure. - Next up we’ll disable
rootfrom being able to SSH into this server. But first, it’s always worth making sure your new user account can get to the server prior to doing this. This may have bitten me once or twice in my sysadmin days of old. ;) - If the SSH connection is successful, go back to your
rootSSH session and disable therootaccount from being able to SSH in to the server.
|
1 |
apt-get update; apt-get install ufw |
|
1 |
apt-get install man-db dnsutils mailtools mailutils unzip |
|
1 2 |
ufw allow OpenSSH ufw enable |
|
1 2 |
adduser phisherman usermod -aG sudo phisherman |
|
1 2 |
cp -r ~/.ssh /home/phisherman chown -R phisherman:phisherman /home/phisherman/.ssh |
|
1 |
ssh phisherman@ipaddress |
|
1 2 3 |
vi /etc/ssh/sshd_config set PermitRootLogin no systemctl restart sshd |
Attempt to open up a new SSH session as root and observe that it fails.. or.. it should unless you stuffed up.

For the rest of this guide, make sure you do all actions with root privileges. If you have closed down your original root SSH session, just make sure your phisherman account executes all commands with sudo. Personally, for tasks like this quick setup, I’ll run a complete shell as root so that I don’t have to type sudo every time I decide to install packages or edit configurations. You can do this simply by executing
|
1 |
sudo bash |
DNS:
Next up, let’s set up DNS. We’ll be adding quite a few DNS records during this server build, but for starters simply create the following records on your domain’s DNS server to point to your droplet public IP address. Quick note, when creating your MX record, give it a priority value of 1.
|
1 2 3 4 5 |
A @ <droplet_ipaddress> A mail <droplet_ipaddress> A smtp <droplet_ipaddress> A www <droplet_ipaddress> MX example1.com mail.example1.com |
If you are using two or more domains for this server, go ahead and create the same DNS records for each domain.
Okay, now we need to generate some SSL certificates for our domain/s. For this we will be using Let’s Encrypt, which can be installed as follows:
- Install the Let’s Encrypt certbot package:
- Next, temporarily allow
httpconnections ingress to our server. - Before requesting a certificate, make sure that no services are bound to port 80. Normally
Nginxwill be bound, but depending on your build other processes may be using port 80, so make sure you check. - Next, let’s use
certbotto grab our SSL certificates. Note that I am grabbing certs for both example domains in this command; obviously omit if you are only using one domain. - If the command executed successfully, close down ingress HTTP connections to our server.
|
1 |
apt-get install certbot python-certbot-nginx |
|
1 |
ufw allow http |
|
1 |
killall nginx |
|
1 |
certbot certonly --standalone -d mail.example1.com -d mail.example2.com |
|
1 |
ufw deny http |
Postfix:
Next up, let’s install an MTA for sending and receiving emails. For my installs I like to use Postfix as my MTA.
- As always, installing packages is easy with Debian’s package manager. When installing Postfix, make sure you choose ‘Internet Site’ when prompted for the mail server configuration type, and set the system mail name to your first domain, in my case mail.example1.com.
- Next, edit Postfix’s main configuration file and add/modify the following. Note that you only add
virtual_alias_domainsif using more then one domain on your server. - Create
/etc/postfix/virtualand add the following to send all mail delivered to the domain to our localphishermanuser: - Create our Postfix lookup table.
- Now start the Postfix service and check that all is running as successfully.
- If successful, you should receive a service status of loaded and active. Next, allow ingress SMTP connections to our Postfix service.
|
1 |
apt-get install postfix |
|
1 2 3 4 5 6 7 8 |
vi /etc/postfix/main.cf myhostname = mail.example1.com virtual_alias_maps = hash:/etc/postfix/virtual mydomain = example1.com mydestination = $myhostname, example1.com, mail.example1.com, localhost.example1.com, localhost smtpd_tls_cert_file = /etc/letsencrypt/live/mail.example1.com/fullchain.pem smtpd_tls_key_file = /etc/letsencrypt/live/mail.example1.com/privkey.pem virtual_alias_domains = example2.com |
|
1 2 |
@example1.com phisherman @example2.com phisherman |
|
1 |
postmap /etc/postfix/virtual |
|
1 2 |
systemctl start postfix systemctl status postfix |
|
1 |
ufw allow smtp |
Theory time:
In the following sections, we’ll be setting up SPF, DKIM, and DMARC. Now I know that most people will just skip past this short bit of theory, but it’s worth knowing what each of these records do as it definitely affects reputation scores of mail servers.
SPF: Sender Policy Framework. Very simply this is a DNS record which helps to prevent spammers and malicious folk from spoofing our domain name when sending email. The SPF record assigns which mail servers are permitted to send mail on our behalf. Now while we don’t really care too much about this, most mail servers will assign a trust score to an incoming email if an SPF record is set. Remember, we need our reputation to be as clean as possible to run a successful phishing campaign.
DKIM: DomainKeys Identified Mail. With DKIM, we set up a DNS record with a public key which can be used to verify that an email has come from a designated domain and has not been spoofed. Furthermore, the DKIM public key also confirms to the recipient that any attachments have not been tampered with in transit. Again, for our purposes, we’re all about racking up those reputation points.
DMARC: Domain-based Message Authentication, Reporting & Conformance. Another DNS record, however the purpose of DMARC is to allow recipient emails to authenticate any messages which are sent from our domain. If authentication is successful, the email will be delivered. If unsuccessful the email will fail it’s check and depending on the recipient email server the email may be rejected.
Okay, that’s about as short and simple I can keep the theory for you. Let’s continue on with setting up SPF.
SPF:
- Install SPF for Postfix.
- Append the following to
/etc/postfix/master.cf: - Append the following to
/etc/postfix/main.cf: - Now restart the Postfix service and check the status to make sure the service is loaded and active.
- Finally add a
TXTrecord for SPF in our domain’s DNS
|
1 |
apt-get install postfix-policyd-spf-python |
|
1 2 |
policy-spf unix - n n - - spawn user=nobody argv=/usr/bin/policyd-spf |
|
1 2 3 4 5 6 7 |
policy-spf_time_limit = 3600s smtpd_recipient_restrictions = permit_sasl_authenticated, check_policy_service unix:private/policy-spf, permit_mynetworks reject_unauth_destination permit |
|
1 2 |
systemctl restart postfix systemctl status postfix |
|
1 |
@ TXT v=spf1 mx -all |
DKIM:
- Install OpenDKIM and the OpenDKIM-tools:
- Add or modify the following variables in
/etc/opendkim.conf: - Add or modify the following in
/etc/default/opendkim: - Add or modify the following in
/etc/postfix/main.cf: - Create a directory to store our OpenDKIM keys:
- Create a
/etc/opendkim/TrustedHostsfile with the following contents: - Create a
/etc/opendkim/KeyTablefile with the following contents: - Create a
/etc/opendkim/SigningTablefile with the following contents: - For each domain we’re using for our phishing server, perform the following:
- Next copy the public key from
mail.txtto aTXTrecord in DNS formail._domainkey. - Finally, restart the Postfix and OpenDKIM services and ensure the status is loaded and active.
|
1 |
apt-get install opendkim opendkim-tools |
|
1 2 3 4 5 6 7 8 9 10 11 12 13 14 |
AutoRestart Yes AutoRestartRate 10/1h UMask 002 SyslogSuccess Yes LogWhy Yes Canonicalization relaxed/simple Mode sv Socket inet:12301@localhost SignatureAlgorithm rsa-sha256 UserID opendkim:opendkim ExternalIgnoreList refile:/etc/opendkim/TrustedHosts InternalHosts refile:/etc/opendkim/TrustedHosts KeyTable refile:/etc/opendkim/KeyTable SigningTable refile:/etc/opendkim/SigningTable |
|
1 |
SOCKET=inet:12301@localhost |
|
1 2 3 4 |
milter_protocol = 2 milter_default_action = accept smtpd_milters = inet:localhost:12301 non_smtpd_milters = inet:localhost:12301 |
|
1 |
mkdir -p /etc/opendkim/keys |
|
1 2 3 4 |
127.0.0.1 localhost *.example1.com *.example2.com |
|
1 2 |
mail._domainkey.example1.com example1.com:mail:/etc/opendkim/keys/example1.com/mail.private mail._domainkey.example2.com example2.com:mail:/etc/opendkim/keys/example2.com/mail.private |
|
1 2 |
*@example1.com mail._domainkey.example1.com *@example2.com mail._domainkey.example2.com |
|
1 2 3 4 5 |
cd /etc/opendkim/keys mkdir example1.com cd example1.com opendkim-genkey -s mail -d example1.com chown opendkim:opendkim mail.private |
|
1 2 3 4 |
e.g. "v=DKIM1; h=sha256; k=rsa; " "p=MIIBIjANBgkqhkiG9w0BAQEFAAOCAQ8AMIIBCgKCAQEA5JK6n0Zju6qjgGENv+pLAHlTW8JkNUUU5cPxiXP3m/6/6BJ4fPIdUhG7ZDqzkfhFMYvvR10yA0UCOWZHhdj38xfZngUa8J4jv8SS9top4OcXJXI3Qrc7OPaflM+kAfrW4javjtGnVB/kXrAMHhwpv5hVRPWCM6BArIGwxLyCVswxV4aJUJBVpgrReDPBHYQRQnTJrL52sWNHYZ" "3lb5icyJmWK8i8P8neSKSldc8vYEa6742l/ZfyXKU36LQQvsvtqdT61rJK2xZ19g8ihEtkcusgCmsZ5KU5Wgp5L6/5kQbtuDylK2Mike3eMNYf7+DFrISSqzSMfMcWJNJulT5acwIDAQAB" |
|
1 2 3 |
systemctl restart postfix opendkim systemctl status postfix systemctl status opendkim |
DMARC:
Setting up DMARC is as simple as adding a DNS record to your domain with as follows:
|
1 |
_dmarc TXT v=DMARC1; p=none |
Local email account:
I find it helpful to have local email access on my server for a few reasons:
- So that I can check for any bounce messages or errors.
- For testing email functionality is working correctly.
- And most importantly, to communicate with phishing victims who respond with emails such as “Thanks for sending that spreadsheet through” or “Thanks for helping me with my account problems” etc etc. ;)
Personally I use Pine, which you can setup as follows.
- Install Pine (now known as Alpine)
- Open up alpine as the user
phisherman, (E)xit the welcome page, navigate to (S) Setup, and then (C) Config - Enter the following information to be able to send and read emails sent to your domain.
- Exit and save the configuration, and then exit Pine. Edit
/home/phisherman/.pinercand enter the following into theinbox-pathfield:
|
1 |
apt-get install alpine |
|
1 2 3 |
personal-name=phisherman user-domain=example1.com smtp-server="" |
|
1 |
inbox-path=/var/spool/mail/$USER |
If you want to send email from multiple domains do some googling for Pine ‘Roles’.
Test your score:
Now for the important bit, testing the reputation of our domain. I like to use mail-tester to “test the spammyness of your emails”; it’s simple, fast, and accurate. Just remember when you send a test email from your server, make sure the email resembles a real life email; just putting in test/test will see you lose a couple of points.

Gophish:
Now for the part that all of this mail server and domain tuning has been all about… Gophish!
- Create our gophish directory:
- Fetch the latest Gophish zip file:
- Unpack Gophish:
- Copy across our Let’s Encrypt certificates so we can use TLS:
- Edit the
config.jsonfile and modify the'phish server'configuration as per below: - Allow ingress SSL traffic to our Gophish service:
- Now run Gophish. Note, I like to run Gophish using screen so I can tear down SSH sessions without the service stopping. Take a look here if you want to run Gophish as a service.
- Next create an SSH tunnel from our *nix box to our phishing server so that we can access the admin panel. I prefer not to expose my Gophish admin panel to the wild interwebz and find this a much more desirable approach.
- Now if you have performed everything correctly, you should be able to access the admin panel locally:
|
1 |
mkdir /opt/gophish; cd /opt/gophish |
|
1 |
wget https://github.com/gophish/gophish/releases/download/v0.8.0/gophish-v0.8.0-linux-64bit.zip |
|
1 |
unzip gophish-v0.8.0-linux-64bit.zip |
|
1 2 |
cp /etc/letsencrypt/live/mail.example1.com/fullchain.pem ./domain.crt cp /etc/letsencrypt/live/mail.example1.com/privkey.pem ./domain.key |
|
1 2 3 4 5 |
"phish server" : { "listen_url" : "0.0.0.0:443", "use_tls" : true, "cert_path" : "domain.crt", "key_path" : "domain.key" |
|
1 |
ufw allow 443 |
|
1 |
./gophish |
|
1 |
ssh <phisherman@ipaddr> -L3333:localhost:3333 -N -f |
|
1 |
access the Gophish admin panel at https://127.0.0.1:3333/ |


Well that’s all for this write-up. I hope you have learnt something and I have given you some ideas on how you could make this even better. Gophish have some really good documentation online to help you get started if you haven’t used the framework before, so be sure to take a look.
In the future, I’ll do a write-up looking at Evilginx + Gophish, which is great for 2FA authentication bypass and session hijacking phishing based attacks, but until then, enjoy, happy hacking, and tight lines.
Awesome write up sir, may you go ahead and do the needful and phish.